FAQ
DEUTSCH / GERMAN[ ]
Wie aktiviere ich meinen TeamSpeak-3-Account?[ ]
Um den TeamSpeak 3 von Vio Reallife im vollen Funktionsumfang nutzen zu können,
müsst ihr zunächst euren TS3-Client mit dem eigenen Ingame-Account verlinken.
Um diese Prozedur durchzuführen, befolgt einfach die nachfolgenden Schritte:
- Startet euren TeamSpeak 3 Client und verbindet auf den TS3-Server von Vio Reallife.
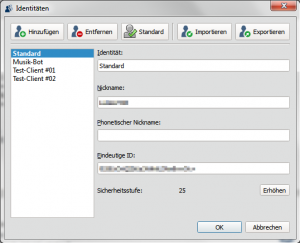
- Klickt nun in der Menüleiste auf "Extras" und wählt "Identitäten" aus, es öffnet sich ein gleichnamiges Fenster.
- Klickt in der linken Liste auf eure Identität, mit der ihr gerade auf dem Server verbunden seid, diese heißt normalerweise "Standard".
- Markiert nun im Feld unter "Eindeutige ID:" die Zeichenkombination und kopiert diese (Maus-Rechtsklick -> Kopieren).
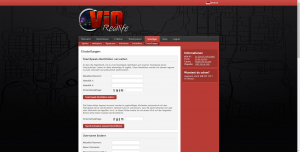
- Loggt euch nun mit euren Zugangsdaten (Vio-Reallife-Server) ins Controlpanel ein.
- Wählt jetzt den Menüpunkt "Sonstiges" aus und klickt dann in der linken Liste auf die unterste Schaltfläche "Einstellungen".
- Gleich als erstes seht ihr nun die Identitäten-Verwaltung, hier tippt ihr unter "Aktuelles Passwort:" euer Passwort (Zugangsdaten) ein, anschließend fügt ihr die von euch zuvor kopierte Eindeutige ID in das Feld "Identität 1:" ein (Maus-Rechtsklick -> Einfügen).
- Zum Schluss gebt ihr noch die Sicherheitsabfrage ein und klickt dann auf "TeamSpeak-Identitäten ändern".
Hinweis: Ihr müsst, um eure Identität freischalten zu können,
während des gesamten Vorgangs auf dem TS3-Server von Vio Reallife verbleiben.
Übrigens: Diese Anleitung findet ihr in leicht abgeänderter Form auch in der
Channelbeschreibung der Eingangshalle auf dem Vio-TeamSpeak³ wieder.
Wo finde ich die Chatlogs?[ ]
Die Chatlogs zeichnen alle Handlungen des Chats auf. Diese Logs werden in einer HTML-Datei abgespeichert,
welche im MTA-File-Ordner später aufgerufen werden können. Log-Auszüge werden zum Beispiel
bei Beschwerden oder Fahrzeugersetzungen gefordert. Wenn diese Logs gefordert werden,
müsst ihr den Inhalt der entsprechenden HTML-Datei entweder als Quellcode im Posting einfügen,
oder ihr ladet die jeweilige HTML-Datei im Internet hoch.
Das Fälschen der Logs ist so gut wie unmöglich, da jede Log-Datei mit einem
speziellen Code codiert ist. Dieser Code wird beispielsweise beim Einfügen als Quellcode
in einem Beitrag als Zahlen-Buchstaben-Kombination angezeigt, mit der ein Admin
die Korrektheit der Logs überprüfen kann.
Übrigens: Das Fälschen von Logs bzw. schon der Versuch ist strafbar.
Beispiel
Dies ist der standardmäßige Pfad zum Speicherort der Chatlogs:
C:\Program Files (x86)\MTA San Andreas 1.4\mods\deathmatch\resources\vio_chat_log
Wie finde ich meine Serial heraus?[ ]
Zu diesem Beitrag liegt ein Video vor!
http://www.youtube.com/watch?v=rSJHUXukFFc
1. MTA:SA starten
2. F8 drücken
3. In der Console "serial" eintippen und mit Enter bestätigen
4. Deine Serial steht nun in der Console:
Your Serial is: __________________________________
Wie füge ich Musik im User-Radio ein?[ ]
Zu diesem Beitrag liegt ein Video vor!
http://www.youtube.com/watch?v=nqfM1cZkb-M
Das Radio, welches ihr auf Vio Reallife in einem Auto hört, ist ein Livestream aus dem
Internet - sofern ihr solch einen Radiosender ausgewählt habt.
Ihr könnt allerdings auch selbst eigene Livestreams in Form eines Webradios hinzufügen.
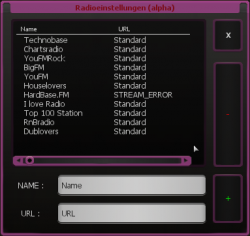
Wenn ihr den unten angegebenen Befehl eintippt, öffnet sich ein Fenster, in dem die
aktuellen Livestreams angezeigt werden. Wählt ihr eine URL aus der Liste und klickt auf das
rote Minus, entfernt ihr den markierten Sender. Um einen neuen Sender hinzuzufügen,
sucht ihr euch den Streamlink im MP3-Codec eures gewünschtes Webradios heraus, fügt ihn
bei "URL :" ein und gebt dann dem Radio noch einen Namen bei "NAME :" - anschließend
nur noch auf das grüne Plus klicken und euer Radio kann ab sofort von euch gehört werden.
Befehle
/radio: öffnet das Menü zum Einfügen oder Bearbeiten von Webradios
Beispiel (aus dem obigen Video)
NAME : 89.0 RTL
URL : http://sites.89.0rtl.de/streams/mp3_128k.m3u
Wo finde ich die Screenshots?[ ]
Screenshots werden standardmäßig mit der F12-Taste gemacht. Ein Screenshot ist eine
Kopie des aktuellen Bildschirmes, so dass man festhalten kann, was man gerade im Spiel gesehen hat.
Screenshots kann man mit Freunden teilen, wenn man etwas lustiges festgehalten hat, man kann sie
in Sozialen Netzwerken sowie in nahezu allen Internetforen posten, man kann diese aber auch
als Erinnerungsstücke behalten oder als Beweismittel für einen Regelverstoß auf Vio Reallife benutzen.
Die Screenshots befinden sich standardmäßig im Installationsordner von MTA:SA.
Erklärung des Dateinamen
Der Dateiname der Screenshots ergibt sich aus einem Zeitstempel, welcher das Datum und
die Uhrzeit der Aufnahme anzeigt.
mta-screen_2014-11-08_16-22-06.png
"mta-screen_" steht bei einem Screenshot immer davor. Danach wird wie folgt beschriftet:
Jahr-Monat-Tag_Stunde-Minute-Sekunde
Die Endung ".png" zeigt an - sofern dies in der Systemsteuerung des Betriebssystems eingeschaltet wurde -
um welchen Datei-Typ bzw. Bild-Typ es sich bei der Datei handelt.
Ein Screenshot wird von MTA:SA immer im PNG-Format abgespeichert.
Beispiel
Dies ist der standardmäßige Pfad zum Screenshot-Ordner auf Windows 7/8/8.1 (64-bit-Version):
C:\Program Files (x86)\MTA San Andreas 1.4\screenshots
ENGLISCH / ENGLISH[ ]
How do I activate my TeamSpeak 3 account?[ ]
In order to be able to use the full range of functions of TeamSpeak 3 from Vio Reallife,
you must first link your TS3 client with your own in-game account.
To perform this procedure, simply follow the steps below:
- Start your TeamSpeak 3 client and connect to the TS3 server from Vio Reallife.
- Now click on "Tools" in the menu bar and select "Identities", a window of the same name opens.
- In the list on the left, click on the identity you are currently connected to on the server, this is usually called "Standard".
- Now mark the character combination in the field under "Unique ID:" and copy it (right mouse click -> copy).
- Now log in to the control panel with your access data (Vio-Reallife server).
- Now select the "Other" menu item and then click on the bottom "Settings" button in the left list.
- The first thing you see is identity management, here you type in your password (access data) under "Current password:", then you paste the unique ID you copied into the field "Identity 1:" (mouse Right click -> Paste).
- Finally, enter the security question and then click on "Change TeamSpeak identities".
Note: In order to unlock your identity, you have to
remain on the Vio Reallife TS3 server throughout the process.
By the way: You can find these instructions in a slightly modified form in the
Channel description of the entrance hall on the Vio-TeamSpeak³ again.
Where can I find the chat logs?[ ]
The chat logs record all actions of the chat. These logs are saved in an HTML file,
which can be called up later in the MTA file folder. Log excerpts, for example
required in the event of complaints or vehicle replacements. If these logs are requested,
you have to either insert the content of the corresponding HTML file as source code in the posting,
or you upload the respective HTML file on the Internet.
Falsifying the logs is next to impossible since every log file has a
special code is encoded. This code is used as source code, for example, when pasted
displayed in a post as a number-letter combination with which an admin
can check the correctness of the logs.
By the way: falsifying logs or attempting them is punishable.
Example
This is the default path to the location of the chat logs:
C:\Program Files(x86)\MTA San Andreas 1.4\mods\deathmatch\resources\vio_chat_log
How do I find out my serial?[ ]
A video is available for this post!
http://www.youtube.com/watch?v=rSJHUXukFFc
1. Start MTA: SA
2. Press F8
3. Type "serial" in the console and confirm with Enter
4. Your serial is now in the console:
Your Serial is: __________________________________
How do I insert music on user radio?[ ]
A video is available for this post!
http://www.youtube.com/watch?v=nqfM1cZkb-M
The radio that you hear on Vio Reallife in a car is a livestream from
Internet - if you have selected such a radio station.
However, you can also add your own live streams in the form of a web radio.
If you type in the command below, a window opens in which the
current live streams are displayed. You choose a URL from the list and click on the
red minus, remove the marked channel. To add a new channel,
if you look for the stream link in the MP3 codec of your desired web radio, add it
at "URL:" and then give the radio a name at "NAME:" - then
just click on the green plus and your radio can now be heard by you.
'Commands'
/radio: opens the menu for inserting or editing web radios
'Example (from the video above)'
NAME: 89.0 RTL
URL: http://sites.89.0rtl.de/streams/mp3_128k.m3u
Where can I find the screenshots?[ ]
By default, screenshots are taken with the F12 key. A screenshot is one
Copy of the current screen so that you can record what you just saw in the game.
You can share screenshots with friends, if you have something funny, you can take them
Post on social networks and in almost all internet forums, but you can also do so
Keep as memorabilia or use as evidence of a violation of Vio Reallife.
By default, the screenshots are in the installation folder of MTA: SA.
'Explanation of the file name'
The file name of the screenshots results from a time stamp, which includes the date and
shows the time of the recording.
mta-screen_2014-11-08_16-22-06.png
"mta-screen_" is always in front of a screenshot. Then it is labeled as follows:
Year-Month-Day_Hour-Minute-Seconds
The extension ".png" indicates - if this has been activated in the control panel of the operating system -
what file type or image type the file is.
MTA: SA always saves a screenshot in PNG format.
Example
This is the default path to the screenshot folder on Windows 7/8 / 8.1 / 10 (64-bit version):
C: \ Program Files (x86) \ MTA San Andreas 1.4 \ screenshots


